The Good Skin Guru Facial Massage Guide by Ricardina Guimaraes
This is your DIY guide for face massage at home. The simplest thing is to spend five minutes in front of the mirror and to be more precise and intentional when you are applying your usual skincare products on. Work in sections – chin, cheeks, and eyes – circling with your fingertips and applying light pressure. Then move on to the jawline. Finish by sweeping upwards along the jawline with the heels of your hands. Step by step massage below.
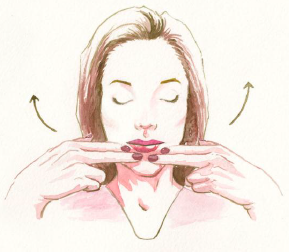
Step 1 – Create an all over glow
Centre the first two fingers of each hand on your chin. Sweep out and up toward your temples. Next, centre fingers above lips and sweep them out and up. Repeat, working up your face toward your hairline. When you get to the forehead, sweep fingers downward.
Step 2 – Plump your cheeks
Put the pads of your thumbs on your cheeks close to your nose, right under your cheekbones. Don’t be afraid to dig in: You want to apply enough pressure to stimulate the muscles under the skin. Slowly draw your thumbs out toward your temples. Repeat once.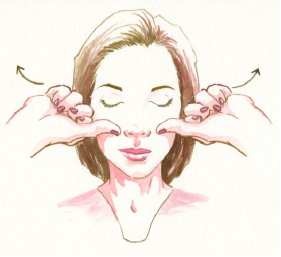
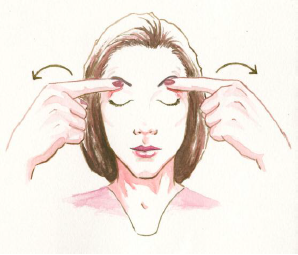
Step 3 – Make your eyes look more open
Put the pads of your forefingers under your brows, on either side of your nose. Apply firm pressure while you slowly draw them out toward your temples, following the arc of your brow bones. Repeat several times.
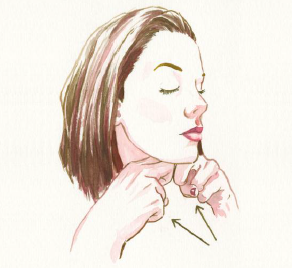
Step 4 – Firm your jawline
Place the knuckles of the first two fingers on each hand under your chin, right behind your jawbone. Slowly move them along the length of your jaw and up toward your ears. Return fingers to starting position and repeat.
Extra tips:
Sort out Sagging:
Don’t believe the adverts, massaging your face in circular motions only drags at the skin without working the muscles at all. Your facial muscles are actually arranged diagonally in line with your cheekbones, so long, diagonal strokes upwards will engage with them and tighten up skin.
Patter Out Puffiness:
If you wake up with puffy skin, go for light tapping motions. This will stimulate the lymphatic system which lies just underneath the skin’s surface and gets rid of excess fluid. Work towards your ears where the lymph nodes are located to flush it all out.
Good as New Neck:
Thought you had to massage the neck upwards? Wrong, it’s actually downwards to get rid of excess fluid being held there.
Oil It Up:
Serums disappear too quickly to massage in so this is where you need face oil. Don’t be scared, oils balance skin so even if you have oily skin you’ll see the benefit in minutes.
Pinch up Your Peepers:
Pinching along your brows stops the upper eyelid sagging and lifts the appearance of brows.
Eliminate Eye Bags:
Always stroke from inside of the eye socket outwards. If you do it the wrong way round (out to in) the other way can make eye bags even worse.
Have a regular professional face massage:
Complement your DIY treatments with a professional treatment if you can. This is the best skin regime. There is a big difference between facial massage and a facial. A massage stimulates the muscles and lymphatic system. Every area of the body responds to facial massage. We have 300 pressure points on the face, which relate to every part of the body, so when you have a good face massage you impact every organ. It makes the face glow and takes the tiredness and sluggishness away.
Why facial massage?
The face is a complex network of muscles which are constantly in use (smiling, chewing, laughing, yawning) and begin to collect tension. This eventually causes constriction of muscle tissue and decreased circulation to the surface tissues. When blood is unable to circulate properly through these tissues, the facial tissue near the surface begins to die, and loses its natural elasticity. While facials are not a miracle worker, they are a very soothing, non-invasive way to let go of the tension held in your face that may be contributing to wrinkles, headaches, migraines, and neck pain.


Sorry, the comment form is closed at this time.